Fix search problems in Windows 10
If this is the very first time you are experiencing this problem, we recommend restarting your PC. A simple reboot of the system flushes memory and disk-cache glitches that adversely affect system performance.
1 Fix search problems in Windows 101.1 Restart the Search Service1.2 Run the troubleshooter1.3 Rebuild the Search Index1.4 Remove Bing from Windows 10 Search1.5 Check for Corrupted System files
Restart the Search Service
Search results depend on the Windows Search service, If the service is stopped or not started for any unexpected reason then Search on Windows 10 may refuse to work.
Press Windows key + R, type services.msc and click ok,This will open the windows services console,Scroll down and locate the windows search service, right-click on it select restart,If the service has not started, right-click on windows search select properties,Here change its startup type automatic and start the service next to service status.Click apply and ok, let if the windows search functions as expected or not.
Run the troubleshooter
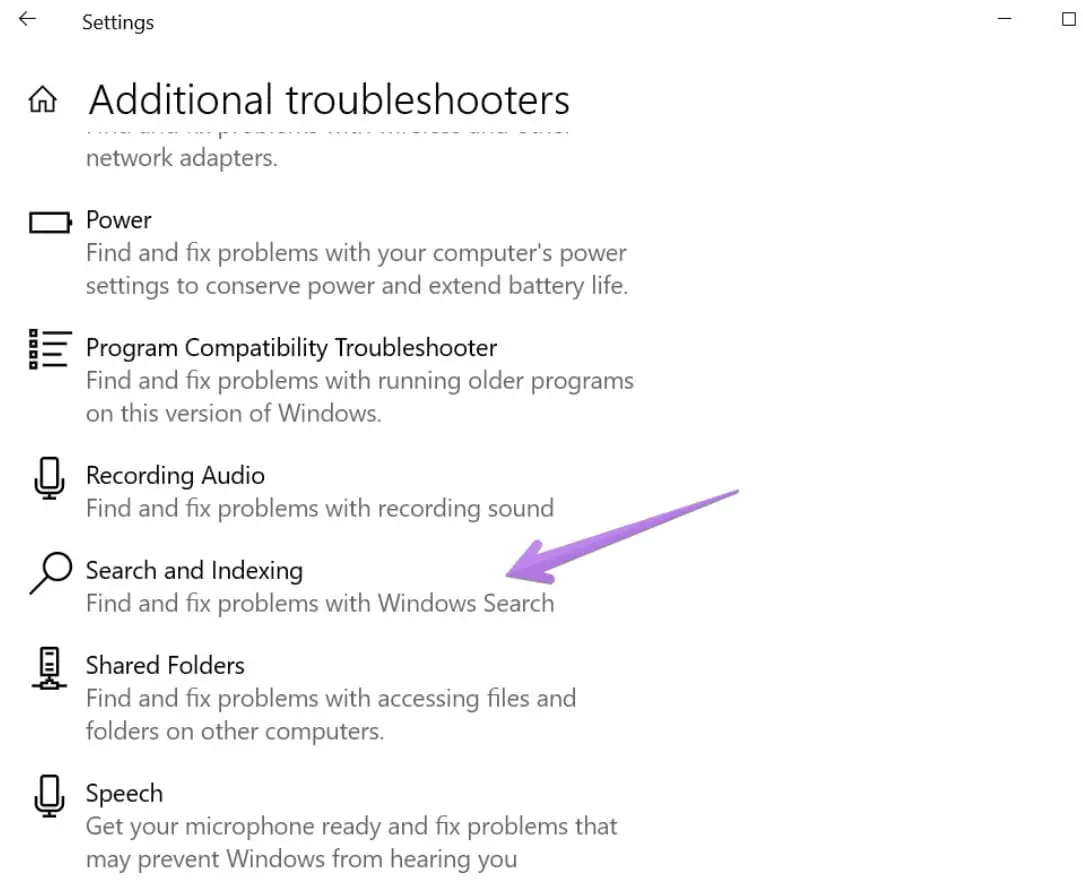
Running build in search and indexing troubleshooter is another effective and easiest way to fix Windows 10 search problems. Run the troubleshooter following the steps below that automatically detect and fix problems that prevent windows search function correctly.
Open Windows settings using the Windows key + I on your keyboard,Select Update and security from within the Settings menu.Select Troubleshoot from the left-hand menu.Next Scroll through the list of options and select Search and indexingClick on the Run the troubleshooter button to start the diagnosis process.Follow the on-screen instructions to tell the troubleshooter what it needs to know before selecting Next and allowing it to work its diagnostics.Once the diagnose process is completed close everything and restart your PC and check if the problem is resolved.
Rebuild the Search Index
If the above solutions didn’t fix the problem then try rebuilding the index database to fix search problems on Windows 10.
Press Windows key + R, type control panel and click ok,Once the control panel window opens, change the view by option in the top-right, and select Large Icon from the drop-down menu.And select Indexing Options from the main menu icons.This will open a new window here click on the “Advanced” button (If prompted, give administrator approval to continue.)In the new dialog, you will see a “Rebuild” button under Troubleshooting click on it.The rebuilding process may take a short time to complete depending on the size of your drive and how full it is.
Remove Bing from Windows 10 Search
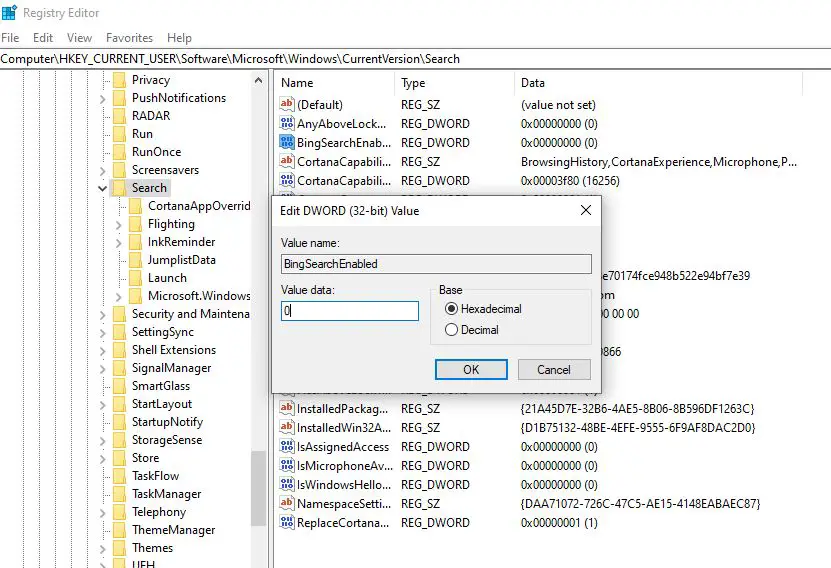
A few users discovered that disabling Microsoft Bing integration in Windows Search restores the service. To do this you need to play with Windows Registry, Let’s follow the steps below.
Press Windows key + R, type regedit and click ok,This will open the Windows registry editor, first backup registry database then navigate the following key HKEY_CURRENT_USER\SOFTWARE\Microsoft\Windows\CurrentVersion\SearchHere Right-click the Search option Choose New > DWORD (32-bit) Value and name it BingSearchEnabledDouble-click the new BingSearchEnabled (That you newly created) and change its value 0Also here look for DWORD “CortanaConsent” and change its value 0 as well.Once done close everything and restart your PC to take effect the changes.
Check for Corrupted System files
Again if windows system files get corrupted, your PC might start misbehaving such as slow performance, windows 10 freezes, or even the start menu search stop working. Run the built-in system file checker utility help restore missing corrupted systems with the correct one.
Open the command prompt as administrator,Type the command sfc /scannow and press the enter key,Let the scanning process to complete 100% once done, restart your PC.
A few users suggested running the SFC utility in Windows 10 Safe Mode solved the problem for them, Also, a few users reported, Activating the Ctfmon.exe process solve the problem. To do this press the Windows key + R, type C:\Windows\System32\ctfmon.exe and click ok. check if this helps. If applying the above solutions didn’t fix the problem, it’s time to utilize the system restore feature that reverts back your windows to the previous working state where windows working smoothly. Note it’s applicable only if you previously enabled the system restore feature. Did these solutions help to fix windows search problems on windows 10? Let us know in the comments below. Also read:
Fix Outlook Search Not Working (Microsoft office 2016, 2013, 2010, and 2007)Solved: Windows 10 start menu search not working after updateWindows 10 Search tricks you probably didn’t know about“Start Menu Search Not Working” After upgrade windows 10 !!!Windows 10 Search function not working properly? Here is how to fix it!


